I know, this isn’t Youtube. I would love to clickbait you with facts about “how glass can survive a bullet” and then tell you some basic facts about Prince Rupert’s drops.
If you know what Prince Rupert’s drops are (how else would you have found this page?), I’m sure you’ve already seen a cool demonstration on Youtube, and now you’re looking for some science behind the drops, but let me explain how Prince Rupert’s drops real quick, for the Google algorithm.
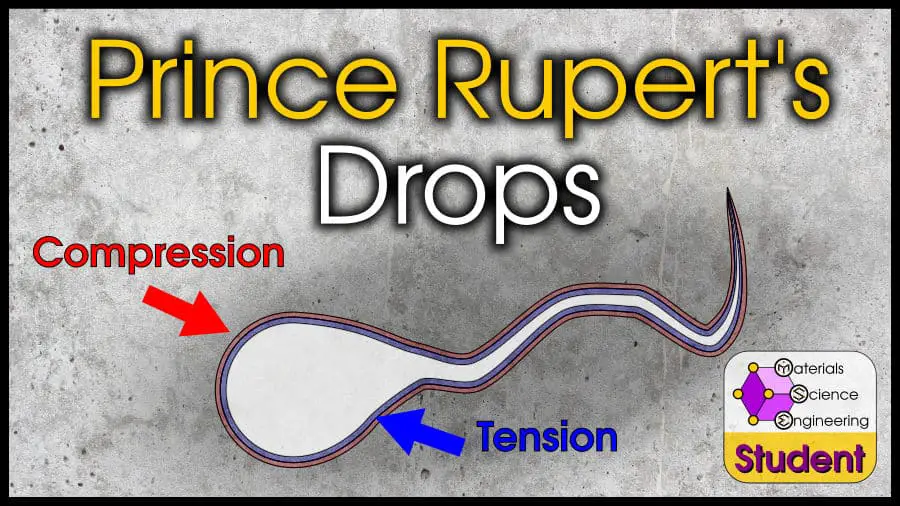
Prince Rupert’s drops (also called Batavian tears) are thermally tempered, tadpole-shaped globules of glass. These drops have an extremely hard “bulb,” but a very weak “tail.” The bulb can survive hammer blows, but a light touch can snap the tail and shatter the entire bulb. Prince Rupert’s drops are made by dropping molten glass into water (quenching).

Prince Rupert’s drops got their name from the 17th century English prince who imported them from Germany and named them after himself. I guess he had the better PR team?
In this article, I’m going to explain how Prince Rupert’s drops work, and a few methods you can use to make your own (one is safer, and edible!). Oh, and in case you haven’t seen a cool video about Prince Rupert’s drops, here is one with some cool shots at high frame rate:
Still, seeing it on video is not as cool as making one in real life, so at the end of the article, I’ll even show you a few ways to make one yourself.
As far as the science behind Prince Ruperts drops, I’ll largely be explaining the results outlined in this paper. I know most of you don’t have access to scientific journals, but if you do subscribe to Applied Physics Letters and you don’t need me to hold your hand, feel free to read directly from the source!.
Outline
Background on Ceramic Glass
If you’re a materials scientist, you’ve probably covered the fundamentals of amorphous structures. If you haven’t, click below to see a full explanation.
Click here to find out more.
Glass is an amorphous structure. Most metals are crystalline, which means that the atoms arrange in nice repeating patterns. The opposite of crystalline is “amorphous,” which means that the atoms are not in any particular arrangement. They are arranged randomly.
That’s actually what “glass” means: an amorphous solid. But the material that you think of, window glass, is silica in an amorphous structure (silica in crystal form is quartz).

Silica is a ceramic. Ceramics are very hard, but also brittle. Ceramics like silica have directional bonding, which means that if you break a bond between two atoms, the bond will not easily reform with the next atom.

That’s why ceramics–including glass–are so brittle. When atoms slide past each other, they form an atomically sharp crack. If forces open the crack past its critical size, the crack will travel at the speed of sound, connect with all the other micro-cracks and shatter the ceramic into thousands of shards.

However, if the ceramic experiences compressive forces, cracks will be forced shut. They won’t grow. This is why ceramics are much stronger in compression than tension. Architecture involves arches and domes because these structures are made of ceramics, and arches use the force of gravity to keep the part in compression.

Since glass is so much stronger in compression than tension, one way to strengthen glass is to pre-compress it.
Glass Tempering
Unlike tempering steel, glass tempering makes the glass stronger. Prince Rupert’s drops, in fact, are an imperfect example of tempered glass.
To temper glass, you need to create compressive stresses in the glass. For the glass to fail in tension, it will need to overcome this pre-existing compressive stress.

To create this compressive stress, engineers change the volume of the outside of the glass. For example, suppose you joined two pieces of glass together. Imagine that the left side is heated, and the right side is cooled. Although they start out with the same size, as the left side cools to the same temperature as the right side, the left side will contract. The left side has a smaller volume than the right side.

Since both sides need to stay joined, the left side wants to force the right side to contract (compression), and the right side wants to force the left side to expand (tension). This causes the right side to experience compressive stress, and the left side to experience tensile stress.
For cracks to travel from right to left, they will need to overcome the compressive force.

Where  is min force to shatter everything.
  is force needed to open the crack.
For cracks to travel from left to right, they will be assisted by the tensile force.

As you may have noticed, this could be really bad. If the tensile force is equal to the critical force, even if there is no external force pulling the crack open, the tensile force will open a crack all by itself.
This is the reason why sudden changes in temperature can shatter glass.
Obviously when you temper glass, you don’t want one side to be weaker than the other. To do this, you need to hide the compressive layer inside the glass. As long as the tensile forces do not initiate a critical crack by themselves, a crack will need to start from the outside, where the glass is strong! (However, once the crack does reach the inside, everything will explode.)
So instead of a side-to-side volume change, engineers temper glass with an inside-outside volume change.

There are two ways to temper glass: thermal tempering and chemical tempering.
Thermal Tempering
Thermal tempering is the example I just showed you. Volume change occurs because of temperature change.
In thermal tempering, the outside of a glass is cooled faster than the inside. This results in an expanded outer layer and condensed inner layer, which interact to create a strong, compressive surface.
In molten glass, this can happen simply by cooling rapidly– the outside will naturally cool faster than the inside.
Remember how glass is amorphous? That means that it’s possible for the exact same composition to have two different densities.
In a regular crystal, the difference between every atom is constant. Yes, it changes based on the temperature of the material, but every bond is identical and the atoms expand or contract simultaneously. Regardless of how quickly you cooled the liquid, it will form a crystal that has a particular atomic spacing dependent on the final temperature.

Overly technical sidenote for complete accuracy.
Okay, fine. Yes, if you cooled a liquid crystalline material very rapidly you will end up with more grain boundaries and vacancies than if you had cooled it slowly. On average, the density of the material would be very slightly lower.
However, my point remains that the actual distance between two atoms remains the same, even if the average distance between two atoms increases because of missing atoms.
Molten glass, however, will be less dense if it is cooled faster. The atoms in a liquid are spaced farther apart than the atoms in a solid. Since no crystal structure will form, turning liquid silica into glass simply means that atoms slow down until they no longer move.
If you cooled it very slowly, the liquid will become gradually denser as it contracts, and the atoms will freeze in place at the point where the liquid was densest.
If you cooled the liquid quickly, however, the atoms will freeze where they were–when the liquid was still less dense.
Thermal tempering uses this concept. If you have molten glass and you cool it, naturally the outside will cool faster than the inside. Heat needs to conduct through the outside before it can leave the inside.
So, if you cool a glass very rapidly, the outside will freeze in place at the expanded volume. Then, the inside will contract as it cools more slowly. The inside will be in tension, and the outside will be in compression!

If you haven’t figured it out already, that’s how a Prince Rupert’s drop works. As the globule of molten glass enters the cold water, it thermally tempers. The outside surface is covered by a powerful compressive layer. The inside is in tension.
However, because glass is so viscous, a Prince Rupert’s drop also has a very thin tail. The compressive and tensile layers travel through the tail as well. Since the tail is so thin, it requires a much smaller force to break it.
Once a crack enters the region of tensile stress, the crack can travel through the rest of the material, explosively shattering it.
Now, I said there was another kind of tempering, chemical tempering. I think chemical tempering is just as cool as thermal tempering, but since I wrote a full article on this and it doesn’t apply directly to Prince Rupert’s drops, I’ll put this section in collapsible text.
Chemical Tempering
Learn more about chemical tempering.
Like thermal tempering, chemical tempering creates compressive stresses in the glass by exploiting volume change.
While thermal tempering contracts the inside of the glass more than the outside, chemical tempering expands the outside of the glass more than the inside, using a chemical reaction.
For example, suppose you had window glass, or soda-lime glass. This glass is not pure silica–it also has sodium atoms which make the glass cheaper. Chemical tempering will exploit these sodium atoms.

If you place the soda-lime glass in a bath of potassium, the potassium can replace the sodium ions. Since potassium is larger than sodium, these potassium ions strain the lattice, providing compressive stress at the atomic level.
There are many advantages (and disadvantages) to chemical tempering vs thermal tempering. However, since that’s not what this article is about, you’ll have to check out this post to read more about chemical tempering.
Properties of a Prince Rupert’s Drop
A Prince Rupert’s drop has a very hard bulb and a thin tail. The bulb can withstand hammer blows and forces in excess of 15,000 Newtons, but the thin tail can be broken with a firm twist.
Wherever the tail breaks, the crack will travel through the drop at the speed of sound, catastrophically shattering the entire drop, including the bulb.
Now you know why this effect happens! The drop is thermally tempered, so a compressive layer of 400-700 MPa is formed (this is huge, considering that the typical strength of this glass would be in the 100-500 MPa range). Underneath the compressive layer is a tension layer waiting to explode, but a crack would have to penetrate the compressive layer first.
This compressive layer is about 10% the thickness of the bulb diameter, and extends into the tail. Since the tail is so thin, it is easy to break. Breaking the tail initiates a crack which enters the tension layer within the tail, and the crack immediately shoots through the entire tension layer.
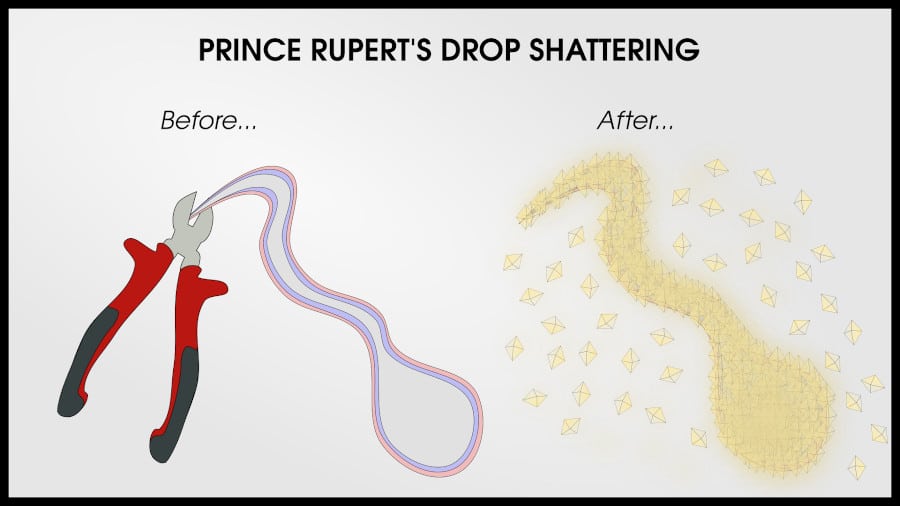
The Prince Rupert’s drop shatters catastrophically.
If you ever try this at home, be careful and wear protective equipment.
That said . . . can you try this at home?
Making Prince Rupert’s drops
You can get soda-lime glass for free. Just take any glass jar–clean up someone’s litter or ask your neighbors if you can take one from their recycling bin if you don’t buy anything in glass jars.
Water is also easy to get, and I trust you can find a bucket to hold the water (don’t use plastic!).
Before I discuss glass-melting methods, let’s talk about safety.
Safety
I shouldn’t have to say this, but I will anyway. Making a glass Prince Rupert’s drop is a dangerous experiment. Don’t do it alone, and make sure you have proper protective gear.
That means close-toed shoes, long pants and a long-sleeve shirt, gloves, safety goggles, and ideally a face shield. Keep a fire extinguisher nearby, tie up long hair, and don’t wear loose or baggy clothing.
When you break the Prince Rupert’s drop, I recommend placing it inside two plastic bags. Hitting the bulb with a hammer will not crack the bulb, but there is a chance that you’ll break the tail this way. When you intentionally break the tail, I recommend using pliers or wire cutters.

When the drop explodes, it may release a lot of energy. Glass shards will fly everywhere.
I say these things to discourage stupid behavior. If you are careful, there is nothing to worry about. Honestly–for concerned parents–even without protective gear, the shards of the shattered Prince Rupert’s drop are usually too small to cause damage. The worst thing that could happen is getting a glass shard in your eye, but this is not a concern if you wear proper safety glasses.
If you don’t use any other protective equipment, you may get a small cut or a splinter. That’s why I want to emphasize the importance of safety equipment, but realistically a Prince Rupert’s drop is much less dangerous than other things kids play with, such as fireworks or hammers.
By far the most dangerous part of experimenting with a Prince Rupert’s drop is making it, which is why I will also explain a low-temperature method of making them.
Traditional Prince Rupert’s Drops
The most difficult part about making your own Prince Rupert’s drops is melting the glass. Soda-lime glass melts around 1000°C, which can be done with a blowtorch or oxy-acetylene torch (or of course, any laboratory furnace which can reach temperatures higher than 1000°C).
If you have a torch, please be careful. Make sure you have a responsible friend to help you (If you are not an adult, make sure a responsible adult does this for you).
I can’t recommend the best way to melt glass with a blowtorch because I haven’t done it myself, but with an oxy-acetylene torch I usually mount the torch so it doesn’t move, hold the glass from far away, and directly place it in the flame.
You may be tempted to place glass in a crucible (high temperature ceramic bowl) and heat it with a blowtorch, but I would not recommend this. You would be shooting fire into a container with one opening, so the area above the crucible will get extremely hot. You may damage your torch,burn your hand, or worse. Never place your face above the heated glass.
If you have a furnace, use a crucible (unless you know glass-blowing methods, in which case you certainly don’t need my advice).
Once you have the molten glass, just pour a teardrop-shaped globule into your bucket of water.

Behold, you have a Prince Rupert’s drop!
But, is there a way to make this without using glass?
Well, you still need a glass. But you can make this by using a glass that melts at a much lower temperature than regular window glass.
Candy Prince Rupert’s Drop
Disclaimer: At the time of writing I have not tested this for myself. However, the science is sound.
The important part of making a Prince Rupert’s drop is to use an amorphous material. My dad likes to cook (especially desserts), and I know that sugar is a crystal that can be melted at relatively low temperatures, in a regular kitchen.
It’s also possible to turn sugar into an amorphous solid, instead of a crystalline solid! This is called “hard candy” and it’s the stuff that makes up lollipops (and cotton candy).
One recipe I found for hard candy suggested 4 parts sugar, one part water, and a little corn syrup. If you mix this together on the stove and cool the mixture rapidly, you should get a glass.
Just as with a regular Prince Rupert’s drop, pour a globule of this into a cup of water (I tried oil so it wouldn’t dissolve the sugar, but I don’t think oil has a high enough specific heat to quickly cool the candy) and you’ll have a Prince Rupert’s drop!
Be careful! Melted sugar can still get very hot and can be quite dangerous.
I also wouldn’t recommend eating the drop until after you have broken it, but the explosive effect should be much smaller, so it might be safe to eat? You didn’t hear this from me . . .
(I found a video of someone doing this)
Polymer Prince Rupert’s Drop
So, I did manage to find a youtube video of someone making a Prince Rupert’s drop out of sugar. It can be done.
I don’t know if it’s possible to make a polymeric Prince Rupert’s drop. (If you can confirm it, please let me know!)
Polymers are much weaker and less stiff than ceramics, so I don’t know if a polymer glass will achieve the same effect as a ceramic glass Prince Rupert’s drop. However, polymers do tend to have high coefficients of thermal expansion, so there is a chance that this might work.
If you want to try making a Prince Ruper’s drop out of a polymer, I recommend trying it with candle wax or a hot glue stick. The trick would be heat these polymers up as high as possible, without burning them.
Both hot glue sticks and candle wax are thermoplastics, which means they can be melted (and re-melted). The exact polymer can vary depending on the type of glue stick or wax, but they should both be amorphous.
So, try dripping wax or hot glue into a glass of water! See if you can get a Prince Rupert’s drop, and advance backyard science!
Final Thoughts
So, now you know everything about Prince Rupert’s drops! You’ve learned that its hardness comes from a process called thermal tempering, which surrounds the drop with a very hard compressive layer. However, inside that compressive layer is a layer of tension which will shatter the entire drop if a crack reaches it. Since that tension extends into the tail of the drop, snipping the tail will shatter everything.
References and Further Reading
Click here to read a scientific article about Prince Rupert’s Drops.