Have you ever bent a paperclip a little bit and noticed it spring back? But when you bend it farther, the paperclips stays permanently bent? The yield point determines the maximum distance you could bend the paperclip without permanently changing its shape.
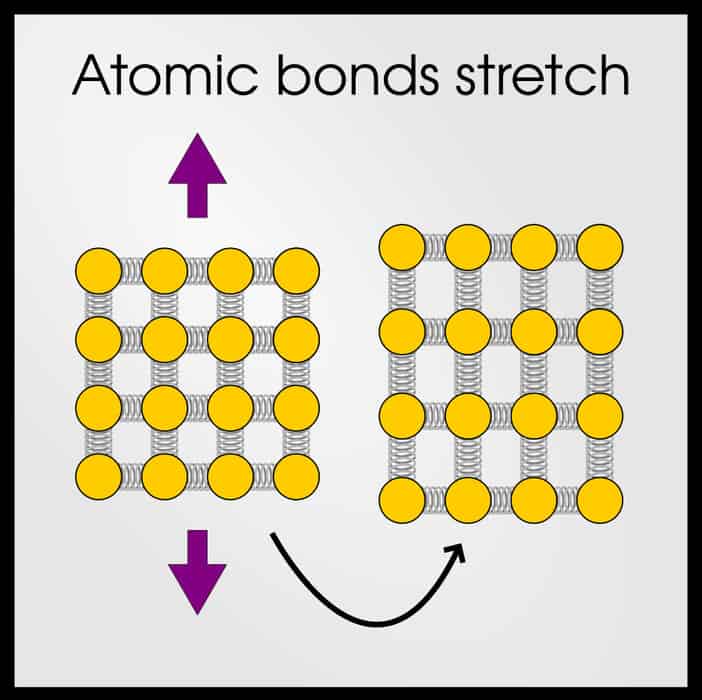
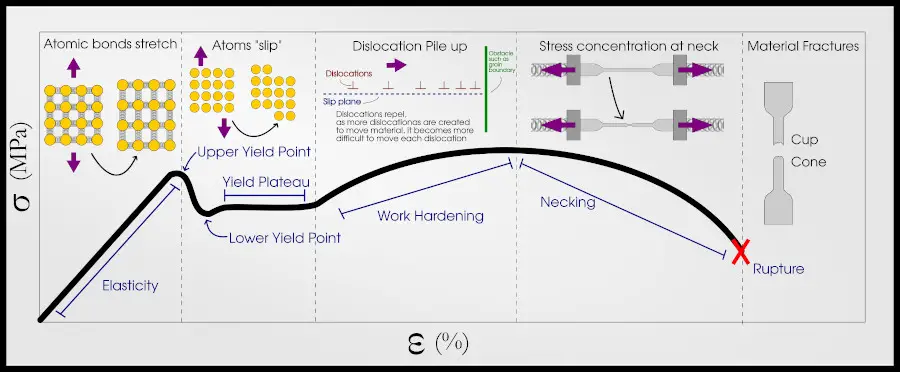
The yield point is the boundary between elastic deformation and plastic deformation. Before the yield point, a material bends by stretching atomic bonds. Beyond the yield point, the atoms have stretched to their limit and further deformation happens because atoms move past each other. On a stress-strain curve, the yield point is the point where the curve is no longer straight.
In this article, you’ll learn all about the yield point, why it is important, how you can identify it, how you can change it, and some values of yield points for common materials.
Outline
Why is the Yield Point so Important?
The yield point tells engineers the yield strength and yield stress.
The yield strength is the maximum force that a material can withstand without taking permanent damage. Unless an application is only made to be used once, the maximum force that a material can be used for is determined by the yield strength.
For engineering applications of “strength-limited design,” engineers need to know the yield strength.
Similarly, the yield stress can determine how far the material can bend before taking permanent damage. If you wanted to use a spring for something, you should put the spring in a position that it could not stretch past its yield stress.
The yield point is also the point where material deformation switches from atomic bond stretching to dislocation motion (more on this later). Before the yield point, a solid’s volume is not actually conserved.
How to Identify the Yield Point on a Stress-Strain Curve
The stress-strain curve is the most important diagram for mechanical properties. This curve relates force (stress) to how much a material moves (strain). If you have never heard of the stress-strain curve before, I recommend you read this article which covers the topic comprehensively.
However, if you just want a quick refresher, here is one in collapsable text:
Click Here for a Refresher on the Stress-Strain Curve
Strain, or how far the material is stretched, is graphed on the x-axis. Stress, or the force applied, is graphed on the y-axis. As the material is stretched, at first the force required to stretch it increases linearly. The slope of this linear line is Young’s Modulus.
At some point (we call this point the yield point) the relationship is no longer linear. The force continues to increase because of strain hardening, but at a less-than-linear rate. Eventually, the bar becomes thin because of necking and the force required to continue displacement actually decreases.
Again, a more in-depth explanation of this behavior is explained in my other article, but for now we are going to focus on the yield point, between the elastic regime and plastic regime .
The elastic regime of the stress-strain curve is the straight-line portion, where Hooke’s law applies. In the elastic regime, all deformation is 100% recoverable.
After the elastic regime, the material “yields” permanently. This regime is the plastic regime, and if a material is deformed into the plastic region, the deformation is not fully recoverable.
The yield point is the boundary between the elastic and plastic regimes.
Well, technically it also involves a 0.2% offset. The transition between the elastic regime and plastic regime is not always super obvious. Some engineers might think the transition happens at once, spot, while others might think that it happens at a different spot. What if there is a small curve in the elastic regime?
To avoid any misinterpretation, engineers have defined the yield point as the 0.2% offset.
To find this point, draw a line parallel to the young’s modulus (the slope of the straight-line portion). Move this line to the right to 0.2% strain–the yield point is where this line intersects with the stress-strain curve.
Technically, it is also possible to define the “proportional limit” as the exact spot that the curve deviates from Hooke’s law, but “yield point” is the much more common metric.
The y-axis value at the yield point is called the yield stress or yield strength, and the x-axis value at the yield point is called the yield stress.
While most materials have yield points, it is not a universal feature. Ceramics have a yield point at the same place as the failure point, and polymers may not have a yield point at all.
Upper and Lower Yield Points
In ductile metals, there may be two yield points on the stress-strain curve.
Here is one stress-strain curve of mild steel (I collected this data several years ago).
The first yield point is the upper yield point. After this point, the stress drops. Then there is the lower yield point after which stress can increase again.
If you want to know why there are two yield points, I will explain the mechanisms in the next section.
What Happens During Yield
To understand what happens at the yield point, you also need to understand what happens at the atomic level in the elastic and plastic regimes.
For all solids, increasing stress results in a linear increase in strain (this is called Hooke’s law). This elastic region may be very small, or it may be quite wide; however, it always exists, because all solids are made of atoms bonded together.

When the material is first pulled, the atomic bonds stretch. They will behave like a spring, which is why Hooke’s law applies. Depending on the strength of the atomic bonds, the crystal structure, and other factors will influence how far the bonds can stretch.
Click Here for a Quick Note on Poisson’s Ratio
If you don’t know, Poisson’s ratio tells you how far a material will contract in one direction if it is expanded in another direction. If a solid is perfectly incompressible, the Poisson’s ratio will be 0.5 (if you expand by 1 cm in the z-direction, they x- and y-directions would shrink by 0.5 cm to keep the volume constant).
However, most materials have a Poisson’s ratio less than 0.5, because atomic bonds are stretching and the volume is actually expanding. Most metals have a Poisson’s ratio of about 0.25-0.35.
So when you pull a material, it expands because the atomic bonds stretch. If you remove the stress (below the yield point), the atomic bonds relax and the material recovers its original shape.
At some point (spoiler: this point is the yield point), the bonds have reached their maximum stretchiness. Now, the bonds need to break. In ceramics, that’s the end of the story. Bonds stretch until they can’t, and then the entire ceramic shatters.
In this case, the yield point would be the same as the failure point.
However, metals have a solution to keep deforming even when the atomic bonds have reached their limit. Atoms “slip” past each other.

Metallic bonding allows atoms to reform bonds just as easily as they can break bonds. What ends up happening is that rows of atoms slip together, forming a dislocation.
At the yield point (or upper yield point), the force required to move a dislocation is less than the force required to stretch atomic bonds, so dislocations move. Dislocation motion cannot be undone, which is why the material deforms permanently.
However, the atomic bonds are still stretched, so the material will recover a little bit.
That’s why if you bend a paperclip really far, even if it doesn’t fully recover its original shape, it will still recover somewhat. When you remove the force, the dislocation motion can’t be undone, but the bonds will still relax.
Dislocations can be repelled by other dislocations (or things like precipitates and grain boundaries), so as the material continues to deform past the yield point, dislocations pile up and make it harder for the material to keep deforming. This is called strain hardening.
If a material has only 1 yield point, then it means that strain hardening happens right away.
If a material has both an upper and a lower yield point, it means that at first, there is not much for the dislocations to interact with. There is a lower yield point, and a yield plateau. After the dislocation density reaches a certain amount, the dislocations begin to interact with each other and strain hardening occurs.
Factors that Affect Yield
There are 4 primary factors that affect yield strength (not counting external variable like temperature).
These factors are:
- Work Hardening
- Grain Boundary Refinement
- Precipitate Strengthening
- Solid Solution Strengthening
At some point I will need to write a full article on each of these mechanisms, but in the meantime, here is a brief explanation.
The yield strength is the point where dislocation motion is easier than atomic bond stretching. So, to increase the yield strength you can increase the strength of the atomic bonds (not really possible without completely changing the material), or you can make dislocation motion more difficult.
These 4 strengthening mechanisms all impede dislocation motion.
Work Hardening
Have you bent a paperclip back and forth, and noticed that it gets harder and harder to bend? That’s work hardening.
Each time you deform a material–or “work” it–you create dislocations. Imagine you want to move a rug, so you pick up a piece and roll it one loop at a time. That’s pretty much a dislocation.
Now imagine you had 2 loops in the rug, going in different directions. Do you see how they lock each other, and prevent either one from moving? That’s why increasing the number of dislocations in a material makes it more difficult for each one to move.
Work hardening is when you intentionally increase the dislocation density to achieve this effect. Cold rolling is a very common example of work hardening.
Grain Boundary Refinement
Most materials are “polycrystalline,” which means they have lots of different crystal grains that point in different directions. Since the crystal orientation is different between grains, the dislocations need to change direction each time they travel from one grain to another.
A lot of the time, the dislocations can’t travel from one grain to another, so they just pile up at the grain boundaries and slow dislocation motion.
If you decrease the size of each grain, you increase the number of each grain, and therefore increase the dislocation pile up. This phenomenon is described by the Hall Petch Equation.
You can make grain smaller by quenching, or by recrystallization.
Precipitate Strengthening
Precipitate strengthening works on the same principle and grain boundary refinement. There are other effects too, but for simplicity let’s stick to dislocation pinning. Precipitates are different phases which can exist in the main alloy.
When a dislocation hits a precipitate, since the crystal structure/orientation is usually different, the dislocation can’t pass through the precipitate will bend around the precipitate. Small precipitates cause the dislocation to bend more, which is called Orowan strengthening. These precipitates can also create new dislocations via the Frank-Reed mechanism.
However, there is also a point where if the precipitate is too small, a dislocation can just cut through it.
But large or small, precipitates will increase the yield strength.
Solid Solution Strengthening
Solid solutions strengthening happens in any alloy. It means that there is one kind of atom dissolved in a different kind of atom.
These atoms have a different size, and different interactive forces with each other. As a result, each different atom creates a small strain on the lattice. This strain can make it more difficult for dislocations to pass through.
Final Thoughts
The most important point on a stress-strain curve is the yield point. The yield point tells you the yield strength and the yield stress. It gives engineers boundaries for the material.
At an atomic level, the yield point corresponds to the maximum “stretchiness” of the atomic bonds, and is the point where atomic slip begins.
The yield strength can be influenced by work hardening, grain boundary refinement, solid solution strengthening, and precipitate strengthening.
References and Further Reading
If you want to get familiar with the concepts of stress and strain in materials, don’t forget to read this post!
Can you tell the difference between true and engineering stress and strain? Check out this article to find out!
Click here to read about elasticity and Young’s modulus!